
Basic WordPress & Gatsby Setup
Hooking up our WordPress with a Gatsby generated site, will be the first steps we are talking on our journey towards a client-ready static-dynamic site.
Table of Contents
Install WordPress and Plugins 💾
Okay, so let’s start by installing WordPress. Use whatever you want for that, either local or online. I’ll be using Local by Flywheel.
Plugins
- WPGraphQL (Documentation) – This will create your GraphQL endpoint.
- WPGraphiQL – Adds a GraphiQL to your WP-Admin, which helps to see changes quickly and figure out what to query.
You can download the .zip files of these repositories and install them through WP-Admin or just navigate to your plugin folder and do a git clone like so:
git clone https://github.com/wp-graphql/wp-graphql
git clone https://github.com/wp-graphql/wp-graphiql
Now make sure to activate all the plugins.
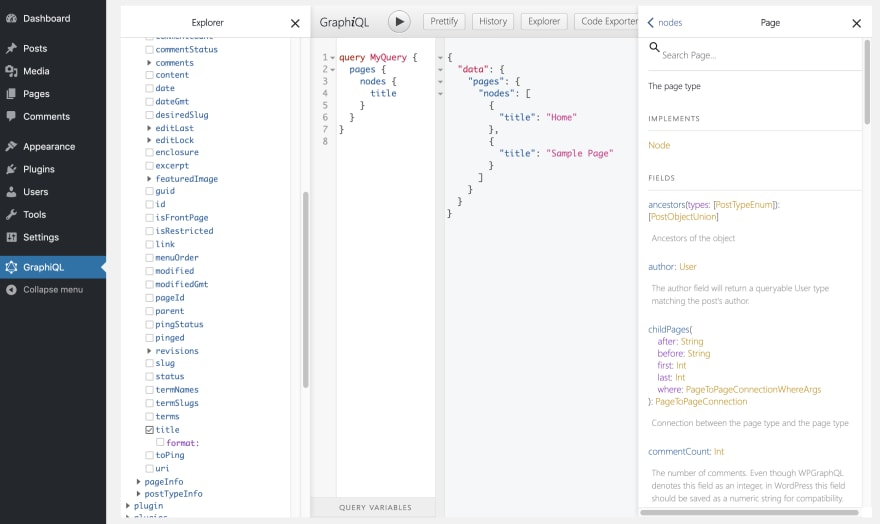
To check out if everything works, head over to the GraphiQL explorer inside your WordPress Admin area and start playing around with it:
Create initial Gatsby site 💻
First of all create a Gatsby project with:
gatsby new gatsby-starter-wordpress-advanced
After that let’s install the first couple of plugins we will use for this part of the tutorial:
Plugins
- dotenv – For loading environment variables.
- gatsby-source-graphql – Helps to source the data from our WordPress GraphQL endpoint.
yarn add dotenv gatsby-source-graphql
Configuration
We will use dotenv to have two different files for environment variables. Create .env.development and .env.production in the root of your gatsby site’s folder. The development one will be called when gatsby develop is used and production is for gatsby build.
Add .env.development to .gitignore:
# .gitignore
.env.development
# .env.development
# This is in gitignore and should not be pushed to the repository.

WORDPRESS_URL=http://gatsby-starter-wordpress-advanced.local
If you use a local WordPress instance, then replace http://gatsby-starter-wordpress-advanced.local with the URL to your local installation. If you just use a online WordPress instance, then use the URL to that.
# .env.production
# Don't put any sensible data here!!!

WORDPRESS_URL=https://your-online-wordpress-instance.dev
Replace https://your-online-wordpress-instance.dev with the URL to your online WordPress instance. In Netlify you also can use environment variables and combine them with what is in this file.
If you use Local By Flywheel, you can expose your local site by enabling
Live Link. You will get anngrok.ioURL, which you can use for the production WORDPRESS_URL.
Now in your gatsby-config.js add this to the top before the module.exports:
let activeEnv =
  process.env.GATSBY_ACTIVE_ENV || process.env.NODE_ENV || "development"

console.log(`Using environment config: '${activeEnv}'`)

require("dotenv").config({
  path: `.env.${activeEnv}`,
})

console.log(`This WordPress Endpoint is used: '${process.env.WORDPRESS_URL}'`)
The snippet above will help to require the right .env file.
Add the following to your configs module.exports inside plugins:[...]:
    {
      resolve: "gatsby-source-graphql",
      options: {
        typeName: "WPGraphQL",
        fieldName: "wpgraphql",
        url: `${process.env.WORDPRESS_URL}/graphql`,
      },
    },
This will hook up your Gatsby with the WordPress instance. And expose this data under wpgraphql. Note: This makes your schema different to the one that is exposed in you WordPress GraphQL endpoint. As soon as you are usinging it with Gatsby, you now have to wrap your queries with wpgraphql{...}.
Try running gatsby develop and navigate to http://localhost:8000/___graphql. You will see something like this. Play around with the GraphiQL-Explorer to get familiar with the WPGraphQL schema.

Create Pages & Posts
Now let’s see, how we can create pages and posts, based on the WordPress data. First remove the index.js and page-2.js in your pages folder. Then, we start with some very simple templates.
Page Template
//src/templates/pages/page.js
import React  from "react"

import Layout from "../../components/layout"
import SEO from "../../components/seo"


const Page = ({ pageContext }) => {

  const page = pageContext.page

  return (
    <Layout>
      <SEO title={page.title} />

      <h1>{page.title}</h1>
      <div dangerouslySetInnerHTML={{__html: page.content}} />

    </Layout>
  )
}

export default Page
Post Template
import React  from "react"

import Layout from "../../components/layout"
import SEO from "../../components/seo"


const Post = ({ pageContext }) => {

  const post = pageContext.post

  return (
    <Layout>
      <SEO title={post.title} />

      <h1> {post.title} </h1>
      <div dangerouslySetInnerHTML={{__html: post.content}} />

    </Layout>
  )
}

export default Post
Gatsby Node
In your Gatsby node, add these lines:
// gatsby-node.js

const createPages = require("./create/createPages")
const createPosts = require("./create/createPosts")

exports.createPagesStatefully = async ({ graphql, actions, reporter }, options) => {
  await createPages({ actions, graphql, reporter }, options)
  await createPosts({ actions, graphql, reporter }, options)
}
To separate their concerns, we split up the creation of posts and pages in different files. Create a folder called create in the root directory.
Create Pages
First we add some requires and define our GraphQL query.
// create/createPages.js

const pageTemplate = require.resolve('../src/templates/page/index.js');

const GET_PAGES = `
    query GET_PAGES($first:Int $after:String) {
        wpgraphql {
            pages(
                first: $first
                after: $after
                # This will make sure to only get the parent nodes and no children
                where: {
                    parent: null
                }
            ) {
                pageInfo {
                    hasNextPage
                    endCursor
                }
                nodes {
                    id
                    title
                    pageId
                    content
                    uri
                    isFrontPage
                }
            }
        }
    }
`
You can see some variables are passed down the query. Refer to the GraphQL Docs for more information on GraphQL query variables. Also, you can see pageInfo with hasNextPage and endCursor. This will help for pagination, as we should not query for all pages/posts together, but rather do 10 at a time. This will ensure, that we don’t put too much pressure on our WordPress backend.
// create/createPages.js

const allPages = []
let pageNumber = 0
const itemsPerPage = 10

/**
 * This is the export which Gatbsy will use to process.
 *
 * @param { actions, graphql }
 * @returns {Promise<void>}
 */
module.exports = async ({ actions, graphql, reporter }, options) => {

  /**
   * This is the method from Gatsby that we're going
   * to use to create pages in our static site.
   */
  const { createPage } = actions
  /**
   * Fetch pages method. This accepts variables to alter
   * the query. The variable `first` controls how many items to
   * request per fetch and the `after` controls where to start in
   * the dataset.
   *
   * @param variables
   * @returns {Promise<*>}
   */
  const fetchPages = async (variables) =>
    /**
     * Fetch pages using the GET_PAGES query and the variables passed in.
     */
    await graphql(GET_PAGES, variables).then(({ data }) => {
      /**
       * Extract the data from the GraphQL query results
       */
      const {
        wpgraphql: {
          pages: {
            nodes,
            pageInfo: { hasNextPage, endCursor },
          },
        },
      } = data

      /**
       * Map over the pages for later creation
       */
      nodes
      && nodes.map((pages) => {
        allPages.push(pages)
      })

      /**
       * If there's another page, fetch more
       * so we can have all the data we need.
       */
      if (hasNextPage) {
        pageNumber++
        reporter.info(`fetch page ${pageNumber} of pages...`)
        return fetchPages({ first: itemsPerPage, after: endCursor })
      }

      /**
       * Once we're done, return all the pages
       * so we can create the necessary pages with
       * all the data on hand.
       */
      return allPages
    })

  /**
   * Kick off our `fetchPages` method which will get us all
   * the pages we need to create individual pages.
   */
  await fetchPages({ first: itemsPerPage, after: null }).then((wpPages) => {

    wpPages && wpPages.map((page) => {
      let pagePath = `/${page.uri}/`

      /**
       * If the page is the front page, the page path should not be the uri,
       * but the root path '/'.
       */
      if(page.isFrontPage) {
        pagePath = '/'
      }

      createPage({
        path: pagePath,
        component: pageTemplate,
        context: {
          page: page,
        },
      })

      reporter.info(`page created: ${page.uri}`)
    })

    reporter.info(`# -----> PAGES TOTAL: ${wpPages.length}`)
  })
}
- So here we first define our
fetchPages()function, that will recursively keep on fetching pages (10 at a time) until there is no more to fetch. It adds them to theallPagesarray. - Then, we map over
wpPagesand callcreatePage(). An action passed down by thecreatePagesStatefully()function given by the Gatsby API (See docs here). - We use
page.isFrontPageto check if we need to adjust the path. For the home page we want the path to be the root path/instead of/home/. - In
createPage()we set the path equal to the uri. This will be creating the slug for the individual page. The component gets ourpageTemplateassigned and finally, we pass the pages data to the context.
-> See the complete file here: createPages.js
Create Posts
createPosts is basically the same with the exception of prefixing the path with blog/.
-> See the complete file here: createPosts.js
Final Thoughts 🏁
If you run gatsby develop now, you should be able to see your pages under http://localhost:8000/sample-page/. If you are not sure what pages got created. Just type in some random slug like http://localhost:8000/asdf/ and you will get an overview of all the pages there are.
This will give you the basic setup we need for the upcoming parts of this tutorial.
Find the code here: https://github.com/henrikwirth/gatsby-starter-wordpress-advanced/tree/tutorial/part-2
Credits ❤️
This part is highly inspired by staticfuse’s (gatsby-theme-publisher). You should check it out!
What’s Next ➡️
Next we’ll build our navigation based on a WordPress menu.
Part 3 – Setup Menu Navigation