
Setup Menu Navigation
In this part we will create some navigation based on a WordPress Menu, to reference our pages and posts, that we generated in the previous part.
Table of Contents
- Create WordPress Menu 🌐
- Create Components in Gatsby 💻
- Menu Child Items 🚸
- Support External Links 🔗
- Final Thoughts 🏁
- What’s Next ➡️
Create WordPress Menu 🌐
Let’s get started by creating content in WordPress.
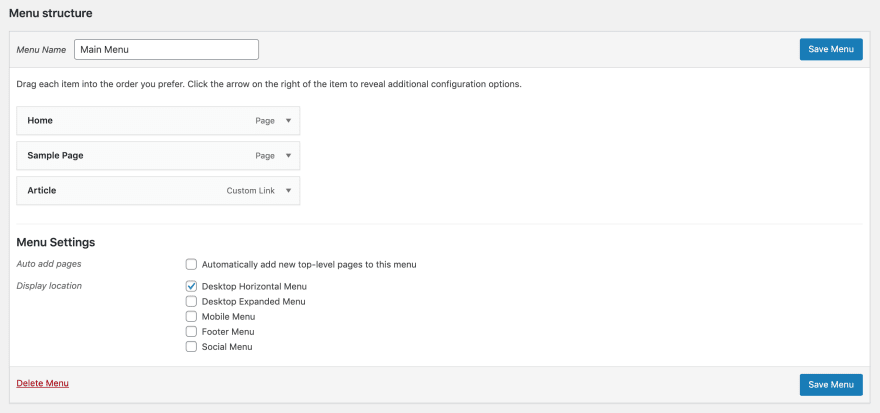
- Before creating a menu, make sure you have some example pages like so:
- Create the Main Menu with the pages you want to add. Assign the page to the primary location.
- Play around in the GraphiQL explorer:
- If you use the WordPress Twenty Twenty Theme and set your menu to the primary position, you have to set the where->location to
PRIMARY. Play around with the explorer to see what options you have in the location drop-down. - As you can see, the URL we get is not relative and there is now slug. We could extend the WPGraphQL schema to add another field for that. We will do this later. For now we just gonna strip the domain from the URL in the frontend (quick and dirty).
- If you use the WordPress Twenty Twenty Theme and set your menu to the primary position, you have to set the where->location to
Create Components in Gatsby 💻
Now, let’s add some code to render our menu in Gatsby.
1.) Creating a utils function to create relative URLs:
// src/utils/index.js

/**
 * Parses a menu item object and returns Gatsby-field URI.
 *
 * @param {object} menuItem a single menu item
 * @param wordPressUrl
 * @param blogURI
 */
export const CreateLocalLink = (menuItem, wordPressUrl, blogURI='blog/') => {
  const { url, connectedObject } = menuItem;

  if (url === '#') {
    return null;
  }
  /**
   * Always want to pull of our API URL.
   */
  let newUri = url.replace(wordPressUrl, '');

  /**
   * If it's a blog link, respect the users blogURI setting.
   */
  if (connectedObject && connectedObject.__typename === 'WPGraphQL_Post') {
    newUri = blogURI + newUri;
  }

  return newUri;
};
The GraphQL endpoint is serving us with absolute URLs to the WordPress instance. Therefore, we have to do some magic to workaround this and get relative URLs.
While this is an easy fix for the frontend, you can also add another field to the schema and do it in the backend. Then you don’t need extra logic and client computation in the frontend. See this docs on how to add custom fields to WPGraphQL.
2.) Creating MenuItem component, that uses our util function:
// src/components/MenuItem.js

import React from "react"
import { CreateLocalLink } from "../utils"
import { Link } from "gatsby"

const MenuItem = ({ menuItem, wordPressUrl }) => {
  return (
    <Link style={{marginRight: '20px' }} to={CreateLocalLink(menuItem, wordPressUrl)}>{menuItem.label}</Link>
  )
}

export default MenuItem
3.) Creating Menu component, that uses our MenuItem component:
// src/components/Menu.js

import React from "react"
import { StaticQuery, graphql } from "gatsby"

import MenuItem from "./MenuItem"

/**
 * Define MenuItem fragment and get all primary menu items.
 */
const MENU_QUERY = graphql`

    fragment MenuItem on WPGraphQL_MenuItem {
        id
        label
        url
        title
        target
    }

    query GETMAINMENU {
        wpgraphql {
            menuItems(where: {location: PRIMARY}) {
                nodes {
                    ...MenuItem
                }
            }
            generalSettings {
                url
            }
        }
    }
`

const Menu = () => {
  return (
    <StaticQuery
      query={MENU_QUERY}
      render={(data) => {
        if (data.wpgraphql.menuItems) {
          const menuItems = data.wpgraphql.menuItems.nodes
          const wordPressUrl = data.wpgraphql.generalSettings.url

          return (
            <div style={{ marginBottom: "20px" }}>
              {
                menuItems &&
                menuItems.map((menuItem) => (
                  <MenuItem key={menuItem.id} menuItem={menuItem} wordPressUrl={wordPressUrl}/>
                ))
              }
            </div>
          )
        }
        return null
      }}
    />
  )
}

export default Menu
Here we are using Gatsby’s StaticQuery to get all the MenuItems. Also, we are making use of fragments to be able to reuse the query fields later on.
4.) And finally adding the Menu to layout.js:
// src/components/layout.js

/**
 * Layout component that queries for data
 * with Gatsby's useStaticQuery component
 *
 * See: https://www.gatsbyjs.org/docs/use-static-query/
 */

import React from "react"
import PropTypes from "prop-types"
import { useStaticQuery, graphql } from "gatsby"

import Header from "./header"
import "./layout.css"
import Menu from "./Menu"

const Layout = ({ children }) => {
  const data = useStaticQuery(graphql`
    query SiteTitleQuery {
      site {
        siteMetadata {
          title
        }
      }
    }
  `)

  return (
    <>
      <Header siteTitle={data.site.siteMetadata.title} />
      <div
        style={{
          margin: `0 auto`,
          maxWidth: 960,
          padding: `0px 1.0875rem 1.45rem`,
          paddingTop: 0,
        }}
      >
        <Menu />
        <main>{children}</main>
        <footer>
          © {new Date().getFullYear()}, Built with
          {` `}
          <a href="https://www.gatsbyjs.org">Gatsby</a>
        </footer>
      </div>
    </>
  )
}

Layout.propTypes = {
  children: PropTypes.node.isRequired,
}

export default Layout
Menu Child Items 🚸
This won’t be part of our code-base for now, but in case you need the childItems of a MenuItem to create a multi-level navigation, you can do so, by adjusting the query like so:
const MENU_QUERY_WITH_CHILDREN = graphql`

  fragment MenuItem on WPGraphQL_MenuItem {
    id
    label
    url
    title
    target
  }

  query GETMAINMENU {
    wpgraphql {
      menuItems(where: {location: PRIMARY}) {
        nodes {
          ...MenuItem
          childItems {
            nodes {
              ...MenuItem
              childItems {
                nodes {
                  ...MenuItem
                }
              }
            }
          }
        }
      }
      generalSettings {
        url
      }
    }
  }
`
This will get 3 levels of menuItems. You will need to add child items to the WordPress menu to see any results. Also, you would need to adjust your component, to support the extra 2 levels in a recursive manner.
Support External Links 🔗
Gatsby’s Link component doesn’t support the use of external links. We want to be able to add external Links to our menu and therefore have to do a little extra work as shown in the Gatsby docs.
1.) Create UniversalLink component:
// src/components/UniversalLink.js

import React from "react"
import { Link as GatsbyLink } from "gatsby"
// Since DOM elements <a> cannot receive activeClassName
// and partiallyActive, destructure the prop here and
// pass it only to GatsbyLink
const UniversalLink = ({ children, to, activeClassName, partiallyActive, ...other }) => {
  // Tailor the following test to your environment.
  // This example assumes that any internal link (intended for Gatsby)
  // will start with exactly one slash, and that anything else is external.
  const internal = /^\/(?!\/)/.test(to)
  // Use Gatsby Link for internal links, and <a> for others
  if (internal) {
    return (
      <GatsbyLink
        to={to}
        activeClassName={activeClassName}
        partiallyActive={partiallyActive}
        {...other}
      >
        {children}
      </GatsbyLink>
    )
  }
  return (
    <a href={to} {...other} target="_blank" rel="noopener noreferrer">
      {children}
    </a>
  )
}
export default UniversalLink
2.) Update MenuItem.js:
// src/components/MenuItem.js

import React from "react"
import { CreateLocalLink } from "../utils"
import UniversalLink from "./UniversalLink"

const MenuItem = ({ menuItem, wordPressUrl }) => {
  return (
    <UniversalLink style={{ marginRight: "20px" }}
                   to={CreateLocalLink(menuItem, wordPressUrl)}>
      {menuItem.label}
    </UniversalLink>
  )
}

export default MenuItem
Final Thoughts 🏁
If you run gatsby develop now, you should see a Navigation with your menu items navigating to you relative page paths.
Find the code here: https://github.com/henrikwirth/gatsby-starter-wordpress-advanced/tree/tutorial/part-3
What’s Next ➡️
Next we’ll build our navigation based on a WordPress menu.
Part 4 – Deployment